This post has nothing to do with crafting but I thought I'd share a few random thoughts. I'm sitting under our apricot tree enjoying the nice shade--shade is very valuable in Utah summers. Yep, it gets hot here (99 f today) because Utah is a desert. The weather has to be one of the biggest misconceptions people have of Utah--particularly that it is snowy most of the year. I suspect our old license plates with "The Greatest Snow on Earth" has something to do with it. That and the winter Olympics. In case you're wondering, the other misconception is that we are all polygamists. For my junior year I went to school in Claremont California while I stayed with my uncle and I can't tell you how many times I was asked if I was a polygamist with several mothers. I laughed really hard the first time, but became alarmed when I was asked repeatedly--did they really think we all were compound polygamists? Crazy.
Moving on...over the last week the apricots on our tree have ripened to the point of falling to (or more accurately bombing) the ground. Walking in the backyard is like an exercise in trying to avoid land mines. (No disrespect to those who have to endure the real danger of actual land mines.) Both the kids and our two dogs have graciously brought the apricot jam into the house and I am constantly cleaning my light carpet. I am also constantly battling mud from our gardens--my husband assures me that picking weeds while the soil is wet is the only way to go, but I'm convinced there HAS to be a better way.
Today was our 'Pick Up All the Smooshed Apricots Day' and while doing, the little dog decided to do a full on back scratch against the blades of grass and yep--on top of a couple freshly shattered apricots. Totally oblivious to the fact that he was sporting new orange spots, he then sat down in it. Lovely. He gets up and mashed apricot pieces wave in his airstream, clinging to the long hair of his bushy tail as he trots toward the house. My hubby intercepts him just in time and hands him off to me. I gave him a very thorough bath and focusing on the positive, he actually looks quite handsome again--it's amazing how dingy he can get without me noticing. He is white and tan, not a mottled creamy cappuccino, who knew?
I just came back out post-scrub and blow-out (just kidding), I came back out to chill in the shade and play on my laptop in my now nice, apricot-free backyard. All of a sudden the leaves shake and bam! an apricot falls. One minute later, bam, bam, bam. In the few minutes I've been sitting here 8 have fallen. The little dog was initially excited and ran to grab the apricot but backed off after it disintegrated from his bite. Both the dogs are now on high alert and I have to admit that I am too. I'm a little concerned I--but most importantly, my laptop--might become casualties. The little dog just took shelter under my chair and our lab must think this is a good plan because he's pushing the little one out and keeping it all for himself. Dogs are so funny. Holy crap! I honestly just got nailed! Luckily it only hit my right arm. While it has been said that lightning doesn't strike the same place twice, I'm not sure this applies to apricots. It's time to go in...
Wednesday, July 9, 2014
Saturday, July 5, 2014
Cute and Easy DIY Magnets
A couple months ago my little Max was playing in my craft storage area and he came to me with a huge grin on his face carrying my Xyron Magnet cartridge. He was intent on playing with it until I snatched it up, put it in the machine and started playing with it myself. I had totally forgotten I even had it! Thanks, Max!
I got to work making magnets with my favorite stamp sets. Crazy, Mixed-Up Love is one of my faves and 2 months after I bought it the set showed up on SU's Retired List. It was a little devastating, especially because I planned on making these for my class. I also used Six-sided Sampler which is happily still available. Hope you enjoy!
 |
| Six-sided Sampler. I am loving hexagons right now! I used the 2013-2015 in colors: Pistachio Pudding, Crisp Cantaloupe, Baked Brown Sugar, and Coastal Cabana |
 |
| Crazy Mixed-up Love. I used a lot of different colors for this set so I'll just list the embossing powder colors: Silver, Tangerine Tango, Melon Mambo, Black, Yellow (not SU) and Tempting Turquoise. Here are the products I used, click on the picture to order. The Crazy, Mixed-up Love icon is NOT the stamp set, it's the My Digital Studio (MDS) set. My Six-sided Sampler stamp set is clear mount, but I added both the wood mount and clear mount so you can choose your preference. Also, the In Color bundle is the cheapest way to get all the stamp pads and cardstock--you'll get 4 sheets of each color. |


Friday, July 4, 2014
The Awesome Possibilities with the Owl Builder Punch
I absolutely LOVE the Owl Builder Punch! My first encounter with it was at my first Stampin' Up class last October when we made darling Halloween cards. We used the Owl Builder Punch to make a bat and a ghost--the bat is the same, you just add wings and the ghost is simply the owl body with the feet removed flipped upside down. I bought the punch that night because I was so enamored by all the possibilities--and I ADORE owls, it's kind of my thing.
I've had a lot of fun with my owl punch and I also like dressing them up. I like to use embossing folders on the dress and either color or glitter the raised design. I use pearl paper which also elevates the design--it looks formal. For the male, I love to add a top hat, a bow tie and cute little buttons for his tux. The heart punch can be used to make the nose and to make bows--all you have to do is overlap the ends. The owl punch is such a unique element (owls are popular but I haven't seen owl punches from other brands) and everyone loves them--I get lots of requests for owl cards. It takes time to work with all the tiny pieces but the result is worth it.
To order:
I plan on trying more transformations of the punch. I found a few indexes from other demonstrators that were amazing! Here's one of my favorites from demo TiaraHelen.
Tiara Helen's Owl Index


 |
| This is the card we made. Isn't it so darling and clever?? I love it! |
I've had a lot of fun with my owl punch and I also like dressing them up. I like to use embossing folders on the dress and either color or glitter the raised design. I use pearl paper which also elevates the design--it looks formal. For the male, I love to add a top hat, a bow tie and cute little buttons for his tux. The heart punch can be used to make the nose and to make bows--all you have to do is overlap the ends. The owl punch is such a unique element (owls are popular but I haven't seen owl punches from other brands) and everyone loves them--I get lots of requests for owl cards. It takes time to work with all the tiny pieces but the result is worth it.
 |
| I used the Lacy Brocade embossing folder on the dress and bow. This is a wedding card for my niece. |
 | |
| On this one I used the circle and heart punch on thick card stock and then used an embossing stylus to emboss the vellum. I then glittered the shapes for a pretty but subtle background. |
 |
| I left this little guy simple. I used Sn@p Color Vibe paper because I love the multi-colored chevrons. I also used the chevron embossing folder on Tangerine Tango to match. |
To order:

I plan on trying more transformations of the punch. I found a few indexes from other demonstrators that were amazing! Here's one of my favorites from demo TiaraHelen.
Tiara Helen's Owl Index
Stampin' Compare: SU Photopolymer Stamps vs. Clear Stamps
Stampin' Compare is my little series where I compare Stampin' Up! products to the same or similar products from other brands. The comparison may be between SU and several brands, or just one other brand. It won't be the same as holding the products in your hand and using them, but hopefully it will give you a better idea of what's out there.
SU Photopolymer (Clear) Stamps:
Stampin' Up just started offering clear stamps (photopolymer) this year! Shelley, Founder and CEO, had said that SU would NOT make clear stamps until they found a better, higher quality material--and they have!
I was a Stampin' Up! Hostess briefly in 2009. Stampin' Up! was my first foray into the art of stamping--it was like the full potential of stamping realized and it was exciting to see the possibilities. I bought several SU stamp sets (still have, love, and use them) but after I quit attending, I just started buying clear stamps. (I didn't realize that I could order SU online.)
I fell in love with both the price of clear stamps and the fun designs. I now have tons of clear stamps and while I still use them, but I prefer my rubber stamps--especially SU"s clear mount stamps. I love clear mount because the stamp itself is rubber with foam backing, the rubber is easier to use and the foam evenly distributes pressure for a perfect image every time. They are also less expensive than wood mounted stamps for obvious reasons and it is easier to see the placement and they take up less space.
The regular clear stamps are more affordable, but you definitely pay a higher price in terms of time and paper--they are simply more difficult to use and it's harder to produce a perfect image. The stamps are really squishy so you have to be careful when you apply pressure, otherwise your image with be thick on the sides and not stamped in the middle. I've been using them for years and I still have to make several practice images before I will stamp my project, hence the use of time and paper.
Another difference between rubber stamps and clear stamps is ink. The best ink for clear stamps is pigment ink because it coats the stamp evenly. You can use water-based ink but it doesn't coat the stamp evenly and it tends to make your image uneven and splotchy--think of an oil and water scenario, the water just doesn't adhere to the material. My remedy is to coat the stamp with a light pigment ink and then ink it with the water-based ink--it changes the color a little bit but the the 2 step method helps the water-based ink adhere evenly.
Another downside is they lose their sticking power because they collect dust and debris like a magnet--even after they're thoroughly washed. Which leads to the annoying occurrence of the stamp falling off after it has been inked and right as its coming in for the landing. If it happens during your practice run you can use tape runner to secure it. I try not to use it with all the stamps because I hate the adhesive residue.
Needless to say, I've been really excited to try SU's new photopolymer stamps and see how they compare. I just got my first clear stamp set and I'm very impressed! They don't have the problems of the other clear stamps. SU clear stamps are VERY firm and won't squish under pressure, so the intricate lines show up perfectly. I used SU water-based ink and it adhered perfectly,without splotchiness and without the hassle of the 2 step method! Finally, the stamps are sticky on both sides and firmly contact the mounting block. I can't compare the dust and debris attraction because they're brand new. I'm hoping the increased stickiness (this is the technical term ;)) doesn't result in increased dirt and dust. I'll keep you posted. Oh and did I tell you, the photopolymer stamps are even less expensive than clear mount stamp sets and the price is comparable to regular clear stamps! I've included some sets from my wish list. I have the Point & Click set and I love it--I can't wait till I get them all!!


Tuesday, June 24, 2014
Mini Clothespins
When I first perused the brand new Stampin' Up! catalog I was really excited to see new mini clothespins: 2014-2016 In Color Printed Clothespins and Plain Wood Clothespins. These new additions have joined the Mini Metallic Clothespins so whether you're going for fancy and sophisticated or casual and adorable, Stampin' Up! has got the perfect embellishment for your project! You can order below.
I jazzed up my plain minis and used the printed designs as inspiration--why not make them unique? I got to work and ended up creating a few different styles. I ended up using 2 packs because I just kept on going! I used the 2013-2015 In colors (I LOVE these colors!) with the printed clothespins as inspiration.
Ribbon Covered Minis:
I used some of my fave American Crafts ribbon on these. I painted glue onto the front and adhered the ribbon. I trimmed it and sealed the edges with a lighter so they won't fray (hopefully!). Be careful on this step because if it is too close to the flame it will leave black residue on your ribbon--this happened to a couple of these but I have decided to call it a distressing technique!


2013-2015 In Color Clothespins:
I inked the wood with my ink pads, which I must say is super easy with the new pads because the pad is smooth and flexible and can easily coat whatever is pressed into it. On a couple of these I added some white ribbon in the space between the spring and wood (not the pin part) and tied a bow. I also sealed this ribbon so it won't fray. The glittery ones were inked, painted with glue and dipped in fine glitter. I used the Basic Pearls and a couple Brights Candy Dots to embellish a couple of them.


My Painted Mini Clothespins:
I used Sakura's Souffle pens (those cool 3D pens that can write on everything, like glass and plastic) to draw the patterns. I then pressed them onto the ink pads and wiped the excess ink from the 'painted' design. I also tried embossing powder on a few. I used a versamark pen (very cool little option) to hold the powder and finished it with a heat gun, as you do. I don't love these as much as the SU printed clothespins because these look more imperfect--I did my best, but they certainly aren't perfect. I suppose I'll call this a charming homemade element! :D

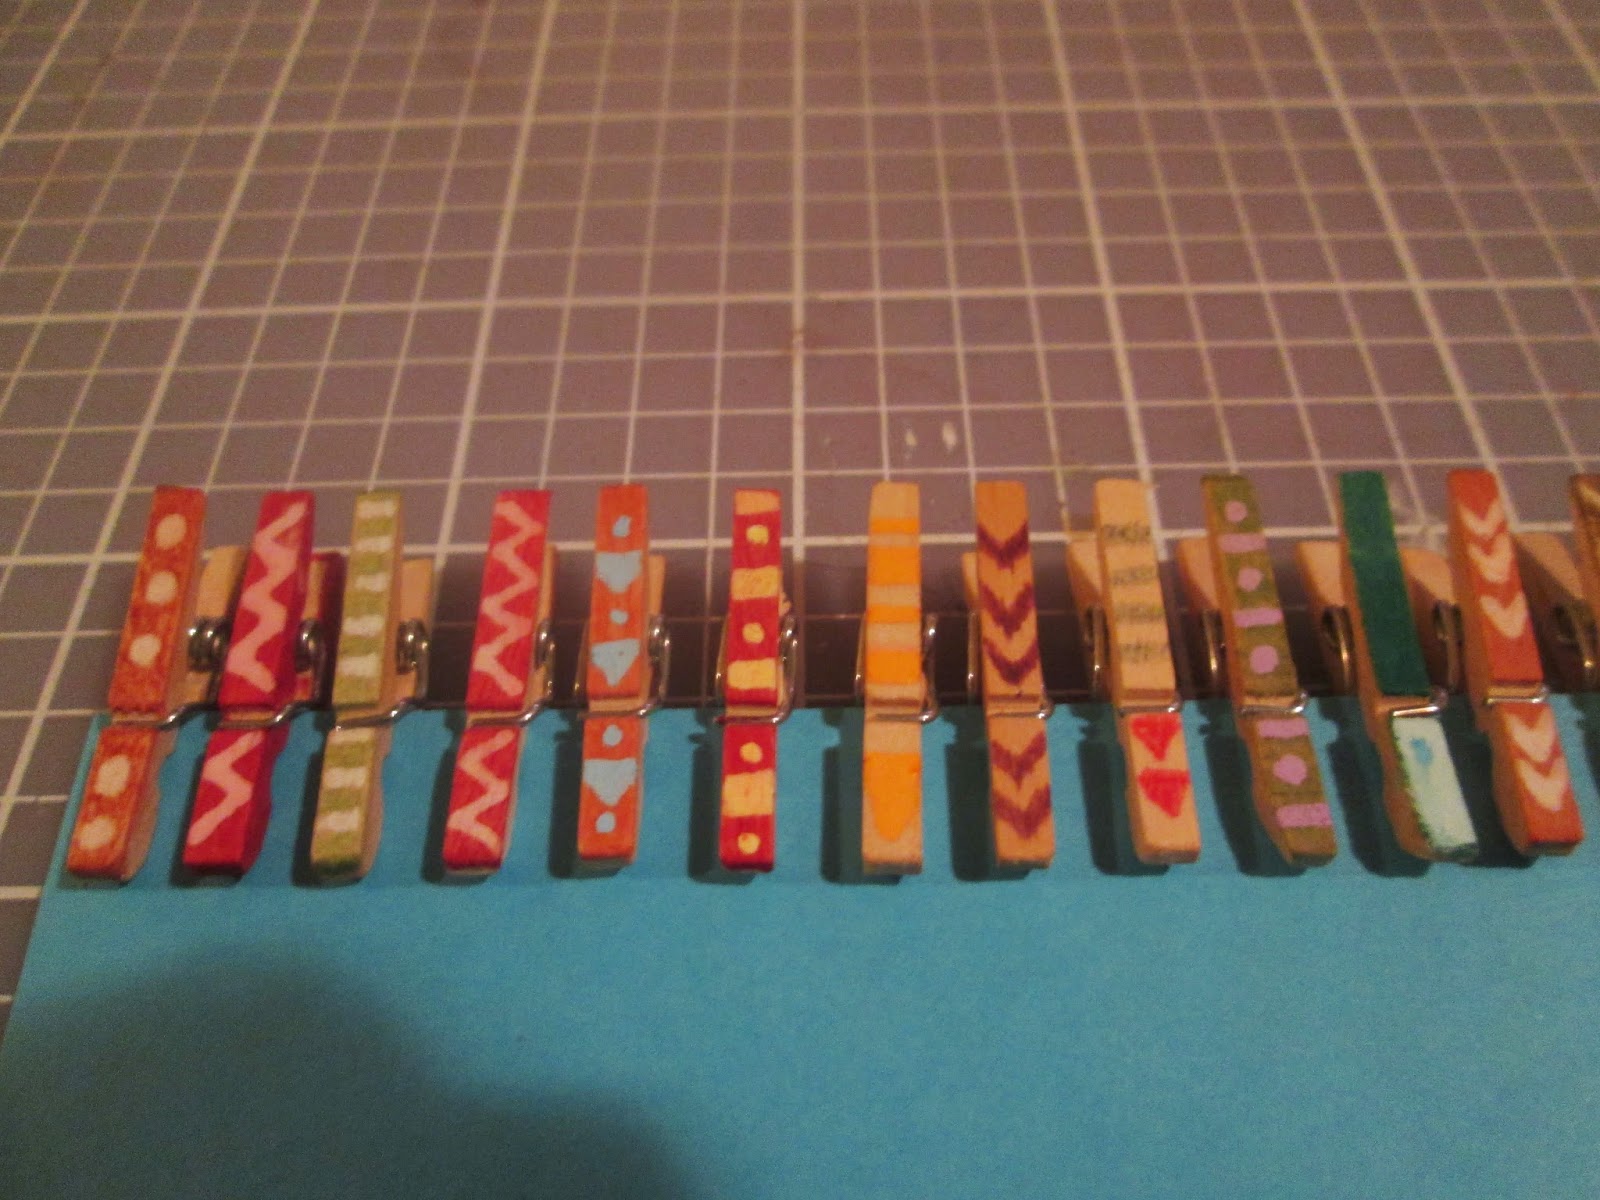
So there you go, my decorated mini clothespins. Let me know what you think and feel free to add suggestions.
Side note: The best and cheapest way to get the new in colors is to buy the bundle. The bundle includes all the ink pads and 20 sheets of cardstock (4 of ea. color) and at $30, the cardstock is basically a freebie. There's a bundle available for each in color collection:
2013-2015: (Item 131204) Crisp Cantaloupe, Strawberry Slush, Pistachio Pudding, Baked Brown Sugar and Coastal Cabana.
2014-2016: (Item 133673) Blackberry Bliss (totally gorg and my fave!), Tangelo Twist, Mossy Meadow, Lost Lagoon, and Hello Honey. Click on the picture below to order:
 |
| Item 133764 $3.95 (24) |
 |
| Item 133630 $5.95 (20) |
Ribbon Covered Minis:
I used some of my fave American Crafts ribbon on these. I painted glue onto the front and adhered the ribbon. I trimmed it and sealed the edges with a lighter so they won't fray (hopefully!). Be careful on this step because if it is too close to the flame it will leave black residue on your ribbon--this happened to a couple of these but I have decided to call it a distressing technique!
2013-2015 In Color Clothespins:
I inked the wood with my ink pads, which I must say is super easy with the new pads because the pad is smooth and flexible and can easily coat whatever is pressed into it. On a couple of these I added some white ribbon in the space between the spring and wood (not the pin part) and tied a bow. I also sealed this ribbon so it won't fray. The glittery ones were inked, painted with glue and dipped in fine glitter. I used the Basic Pearls and a couple Brights Candy Dots to embellish a couple of them.
My Painted Mini Clothespins:
I used Sakura's Souffle pens (those cool 3D pens that can write on everything, like glass and plastic) to draw the patterns. I then pressed them onto the ink pads and wiped the excess ink from the 'painted' design. I also tried embossing powder on a few. I used a versamark pen (very cool little option) to hold the powder and finished it with a heat gun, as you do. I don't love these as much as the SU printed clothespins because these look more imperfect--I did my best, but they certainly aren't perfect. I suppose I'll call this a charming homemade element! :D
 |
| The clothespins to the right of the Bermuda Bay mini are embossed--except for the yellow one, which is covered in Chevron ribbon--I forgot it on the ribbon pics and lazily decided not to retake the pics :D |
So there you go, my decorated mini clothespins. Let me know what you think and feel free to add suggestions.
Side note: The best and cheapest way to get the new in colors is to buy the bundle. The bundle includes all the ink pads and 20 sheets of cardstock (4 of ea. color) and at $30, the cardstock is basically a freebie. There's a bundle available for each in color collection:
2013-2015: (Item 131204) Crisp Cantaloupe, Strawberry Slush, Pistachio Pudding, Baked Brown Sugar and Coastal Cabana.
2014-2016: (Item 133673) Blackberry Bliss (totally gorg and my fave!), Tangelo Twist, Mossy Meadow, Lost Lagoon, and Hello Honey. Click on the picture below to order:


Subscribe to:
Comments (Atom)